Using translations from Crowdin
This article provides instructions for integrating Crowdin translations into email templates, transactional sendings, and marketing campaigns.
Translating email templates
Adding variables for translation
To begin using translations for your emails, you must add specific variables when creating a template in the Sendios system, indicating which texts need to be translated. The syntax for this function is {{ t('text') }}, where "text" represents the text to be translated. For example, {{ t('Good day') }} is used to translate the phrase "Good day."
Tips on syntax when writing translation functions
- Punctuation marks
.,:;()«»!?-can be included in the translation function; - Quotation marks should be used in the following format:
“”or«»; - When using apostrophes in the translation function, ensure they are used in a way that avoids errors when saving the template:
’.
Creating translations
After adding translation functions in templates, you need to create actual translations for each text. This is implemented through integration with the Crowdin translation system. You can easily modify the text and add translations for each function according to the language or audience you are addressing.
For detailed information on working in the Crowdin system, please refer to the section Making and approving translations in Crowdin of this article.
Checking translation readiness
To check whether the translations are ready and have been uploaded to the Sendios system, open the required email template and click on the Translation 🌐 in the top panel.
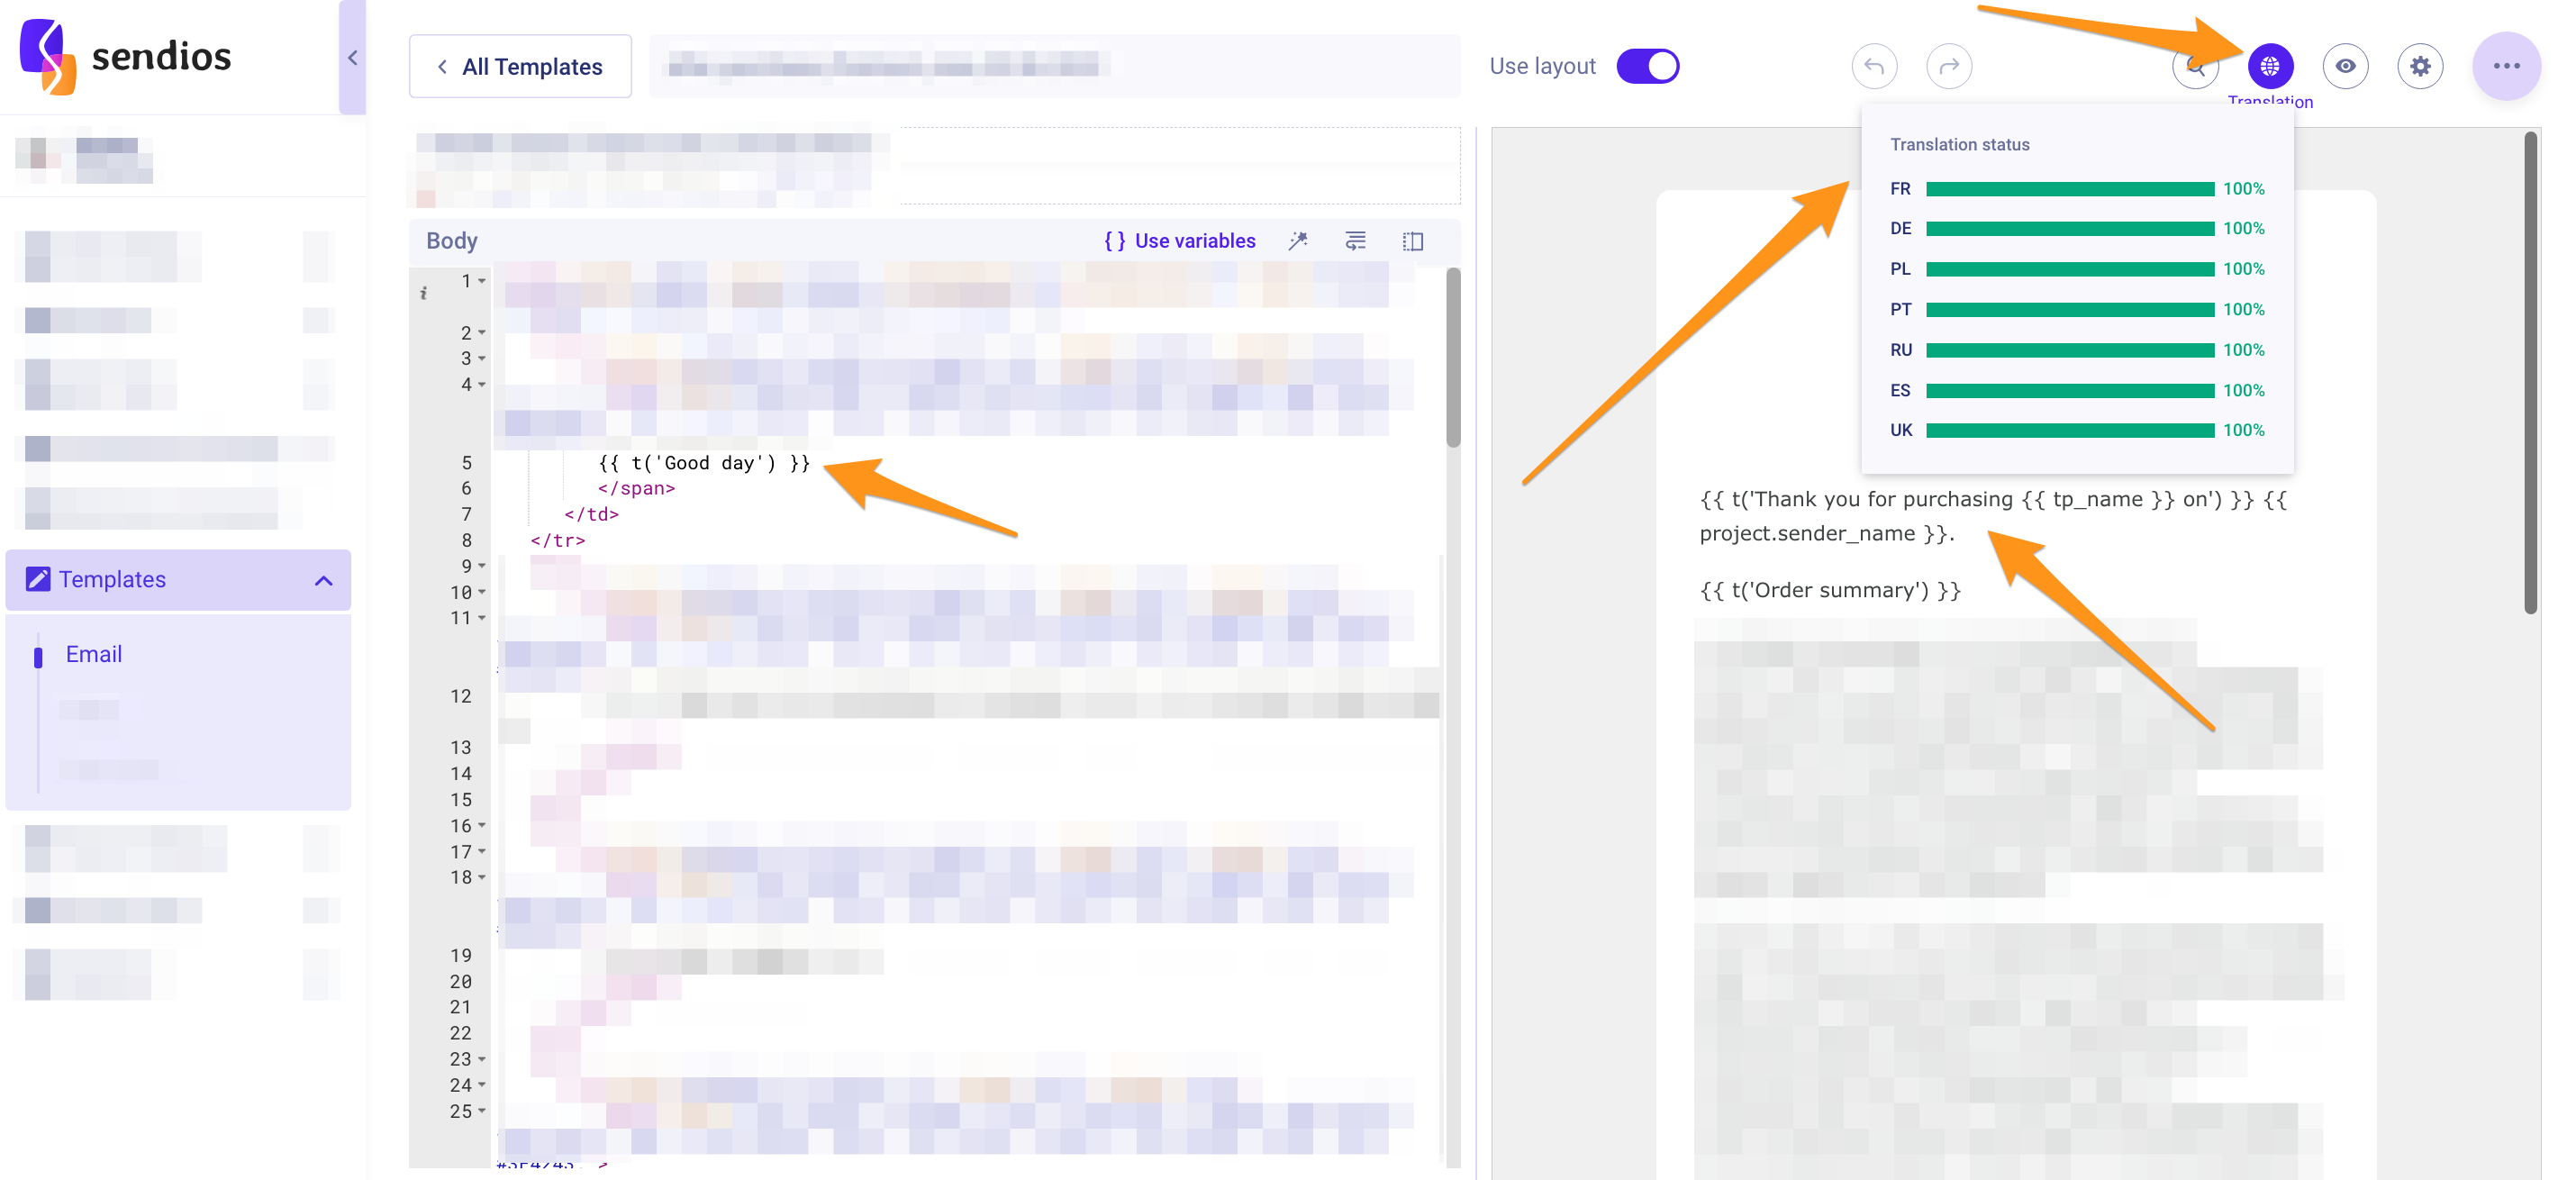
Untranslated email texts will be sent in the original language, for example, in Ensligh.
Using translations in emails
Once you have the necessary translations for texts, they are incorporated into your emails. When sending an email the Sendios system will automatically select the appropriate translation based on the recipient's chosen language.
Translating transactional email subjects
You can enable the translation option when creating or editing a transactional email. To do so, go to the Transactional emails page and click + to create a new transactional email or select the desired one from the existing list and click on the three dots → Edit | view. Below, we will guide you through the complete process of creating a new transactional email and using the translation option.
- Select the Project, for which you are creating this email, and specify the type of the email (Trigger / System). Enter the name of the transactional email (Name) and its identifier (Type ID);
- In the Subject section, add the email subject(s) you intend to send;
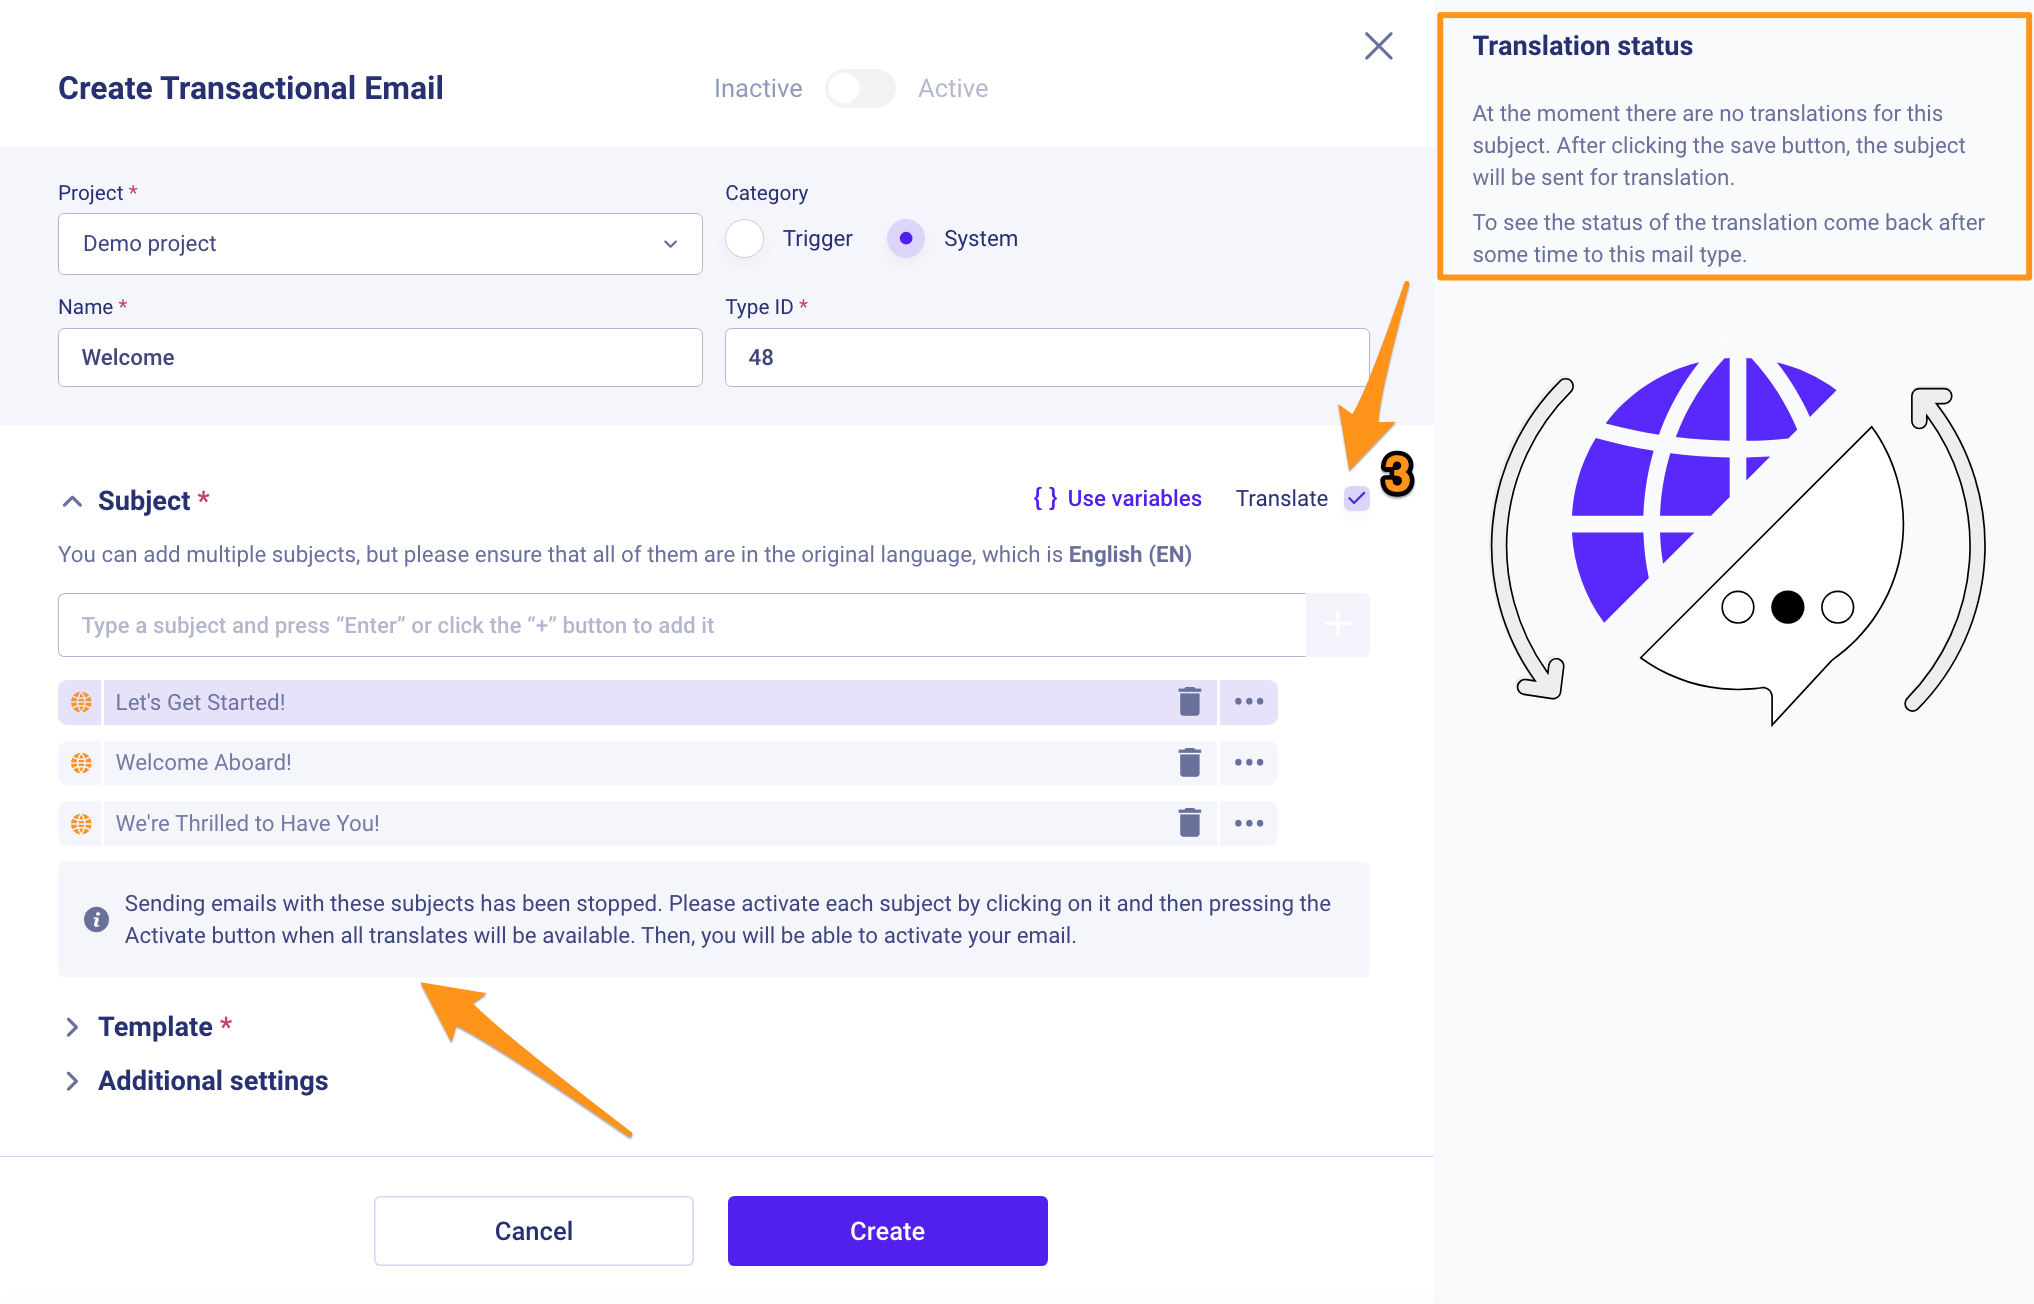
Ensure that email subjects are written in the same language as specified in the Crowdin translation system.
- Activate the Translate checkbox;
Please note that this checkbox will only become available after integrating with the Crowdin translation system. For more details, refer to the Crowdin Integration article.
After this step, the transactional emails will be automatically deactivated, and you will be able to send it only after translations for at least one email subject in all the selected languages have been uploaded to the Sendios system.
You can monitor the translation status by clicking on the globe icon 🌐 next to the email subject. The panel on the right will display a list of languages to which this email subject is being translated, along with the status of each translation – whether it is ready and has been successfully uploaded to our system.
- Add an email template in the Template section;
- Configure the parameters in the Additional Settings section if necessary;
For detailed instructions on filling out each section, consult the article How to Create a Transactional Email?.
- After entering the necessary information, click Create;
Please note that text segments are sent to the Crowdin translation system only after saving the email (by clicking Create). It's recommended to add them in advance so that completed translations are available in the Sendios system by the time to send.
- Now, wait for all added text segments to be translated in the Crowdin system and uploaded to our system. After successful translation, check and activate each email subject separately. To do so, select the relevant transactional email from the Inactive list and click on the three dots → Edit | View.

- In the Subject section, click on the globe icon 🌐 next to the required email subject. Review the translation of the phrase that appears on the right side of the window and click Activate.
To start sending, it is sufficient to have only one translated email subject for all specified languages. Email subjects that you have added but have not yet activated will not be used in mailings. Having translated, you can return to editing the corresponding transactional email and activate them for further use.
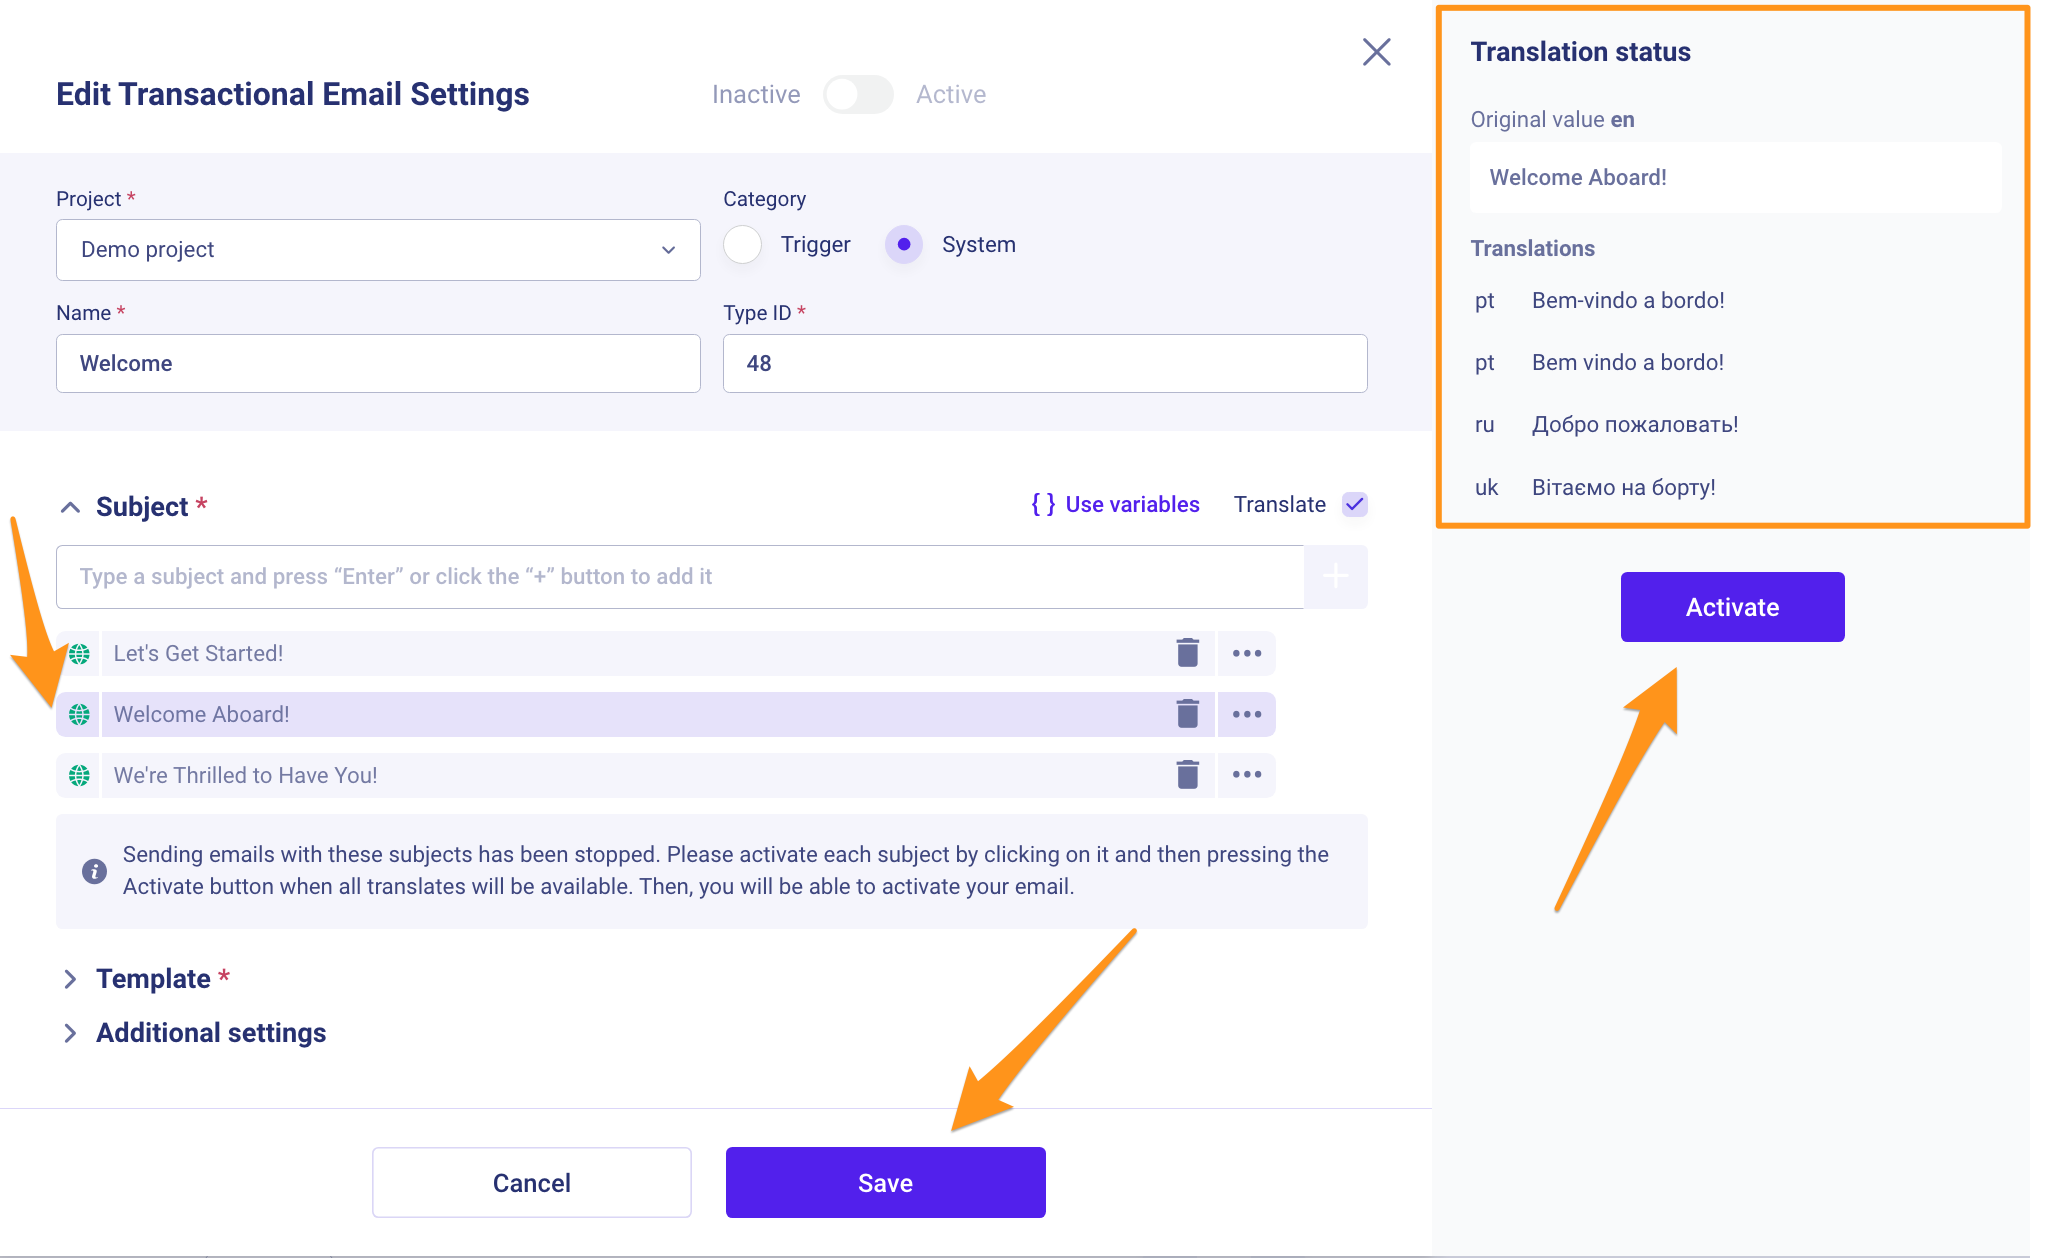
- After activating the email subject translations, you will see the probability of sending the email with each of them, and you can activate this transactional email using the Active / Inactive switch.
Don't forget to save your changes. To do this, click Save.
Congratulations! You can now send emails using configured translations.
Please note that if you wish to change (add or remove) translation languages, be sure to inform your Customer Success Manager, as this requires configuration adjustments on our side.
Adding new translation languages is a time-consuming process, so please be careful when choosing languages and integrating translations.
Translating marketing campaign subjects
- First, navigate to the Marketing Campaigns page, where you can create a new campaign.
- In the Campaign Details section, fill in all the necessary information: enter the campaign name (New Campaign name), select the Project (Project), and define the target audience (Target Audience). Then, click the Next Step button.
- In the Subject section, add the email subject(s) you wish to send.
Please note that the language of the email subject must match the primary language you are using in the Sendios system for creating templates and campaigns, as well as the source language for translation in the Crowdin system.
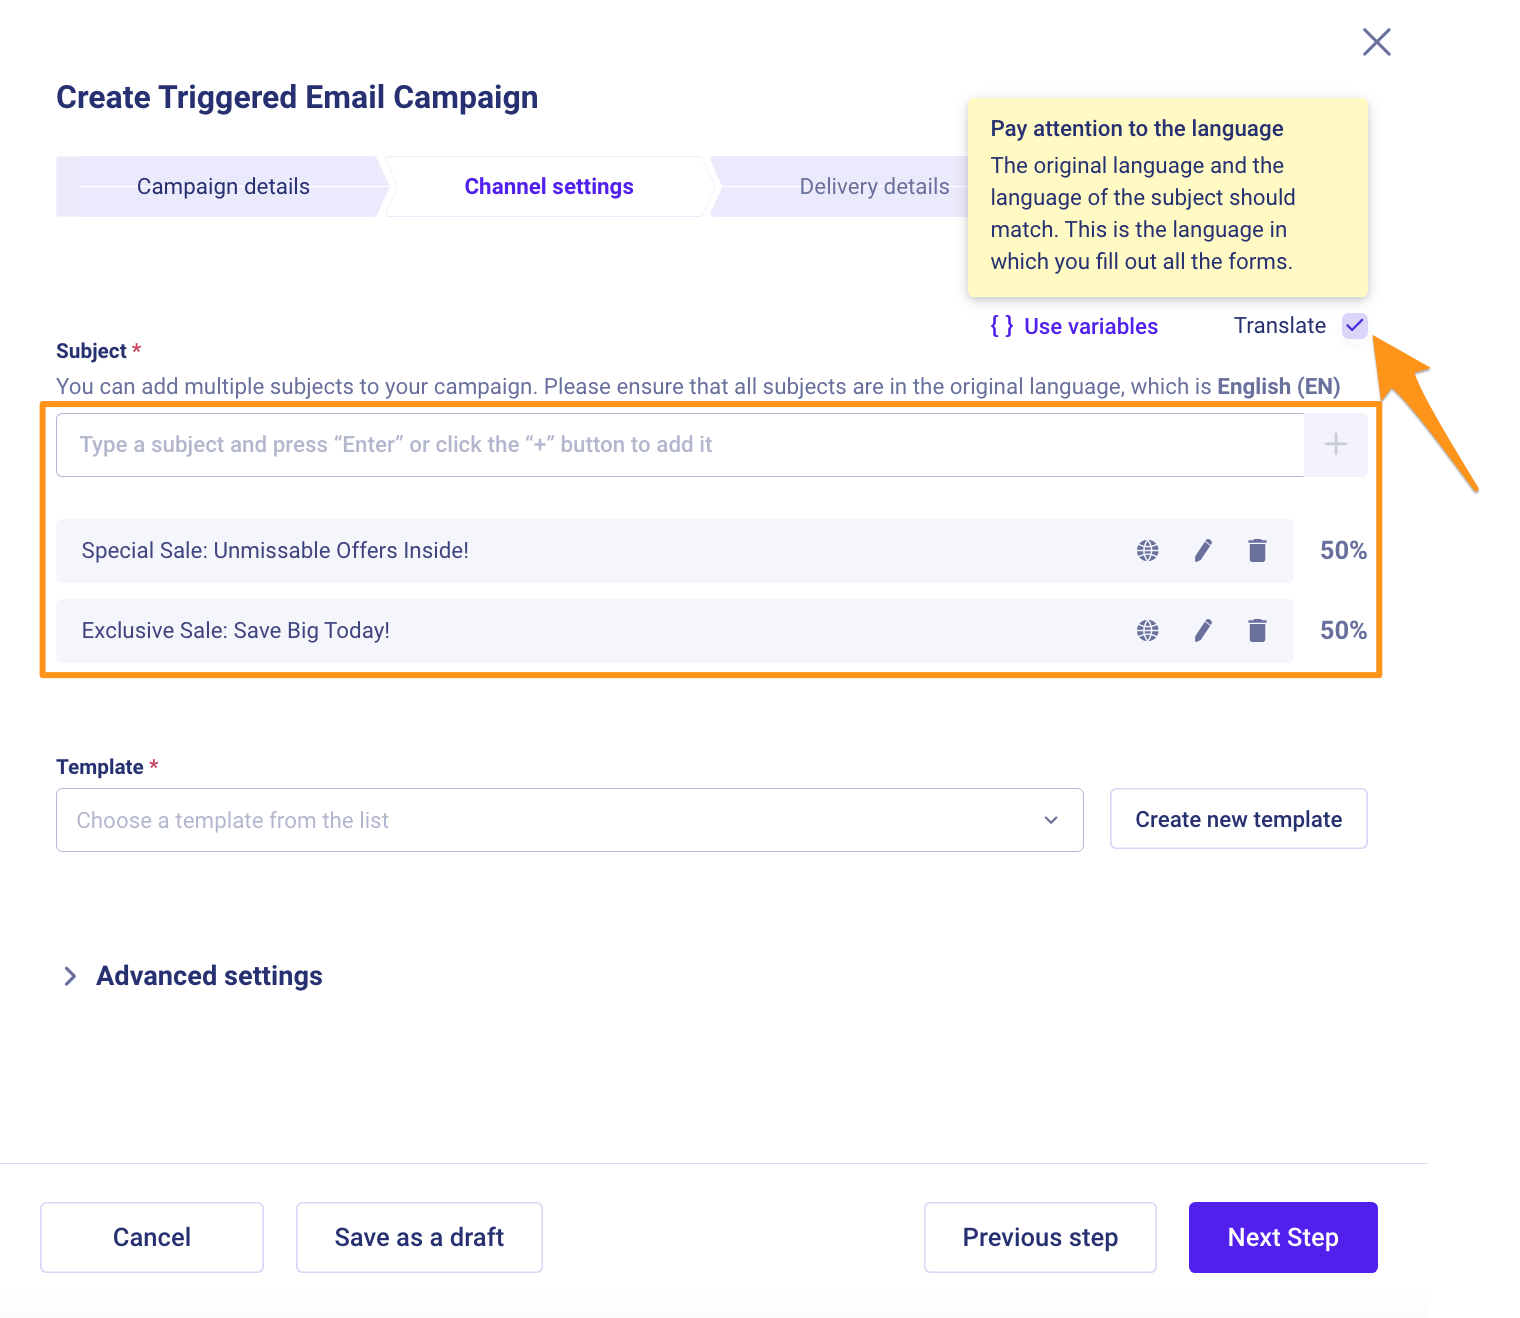
- Activate the Translate checkbox;
Please note that this checkbox will only become available after integrating with the Crowdin translation system. For more details, refer to the Crowdin Integration article.
- Fill in all other required information for creating a marketing campaign: add a template (Template), enter additional information in the Additional Settings section if needed, and specify sending parameters based on the campaign type you're creating;
- After entering all the information, click Save as Draft to save the marketing campaign.
If you run a marketing campaign before the translations are loaded into the Sendios system, the emails will be sent only in the original language.
- To check if the translations are ready and uploaded to the Sendios system, go to editing of the marketing campaign by selecting it from the list and clicking on three dots → Edit | View;

- In the Channel Settings → Subject section, click on the globe icon 🌐 next to the corresponding email subject. On the panel on the right, review the translations of the email subject and click Next step.
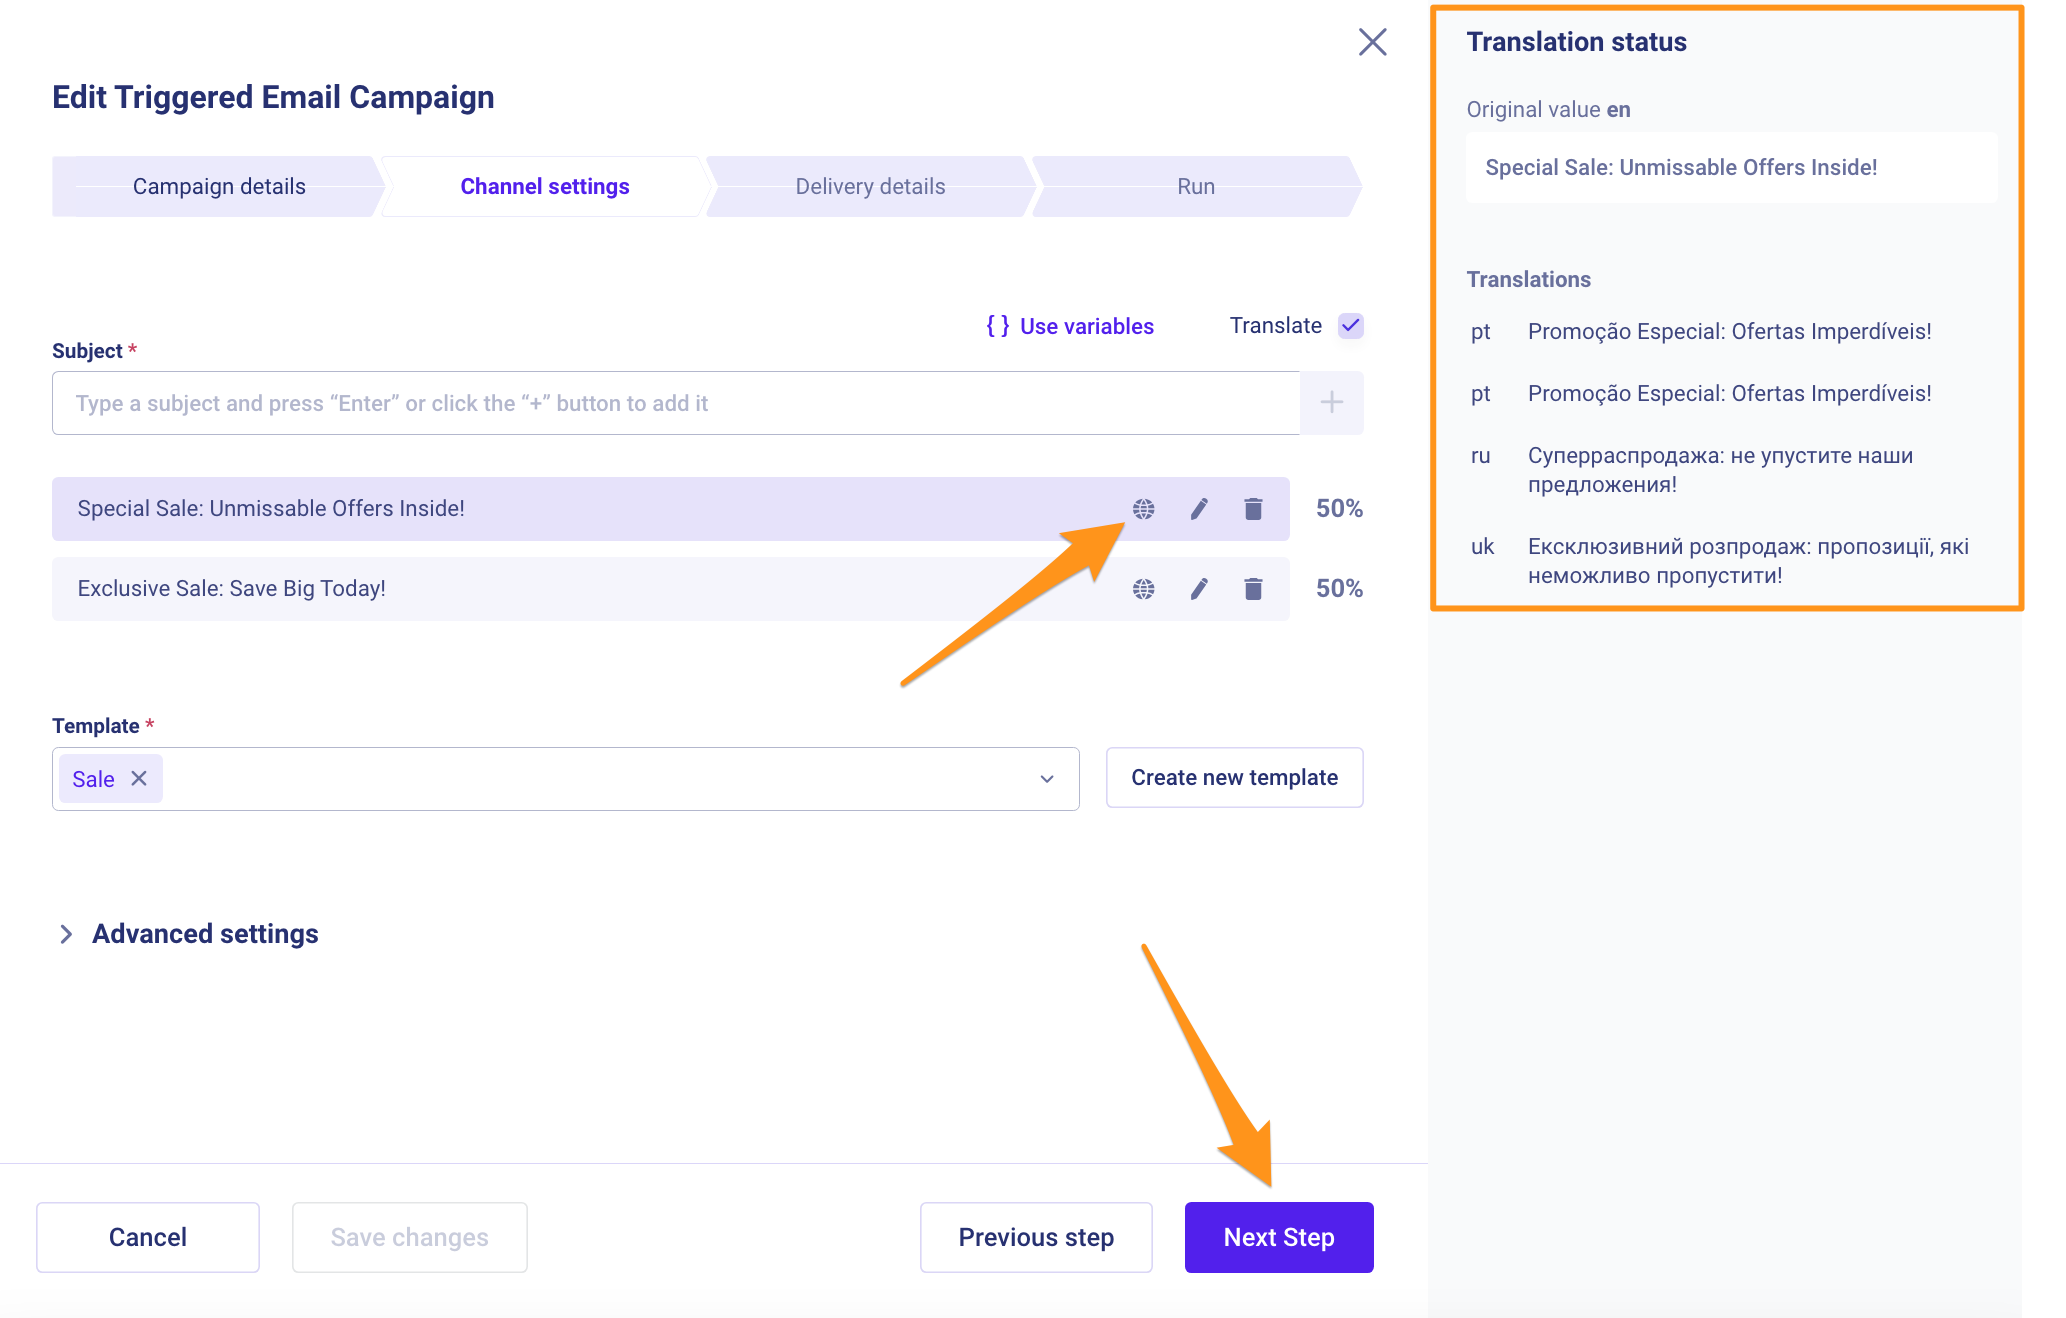
- On the last page of editing the marketing campaign, click Run Campaign to launch it.
Making and approving translations in Crowdin
After creating the email subject and template in the Sendios system, it is necessary to translate and approve them in the Crowdin system.
- Log in to the Crowdin platform;
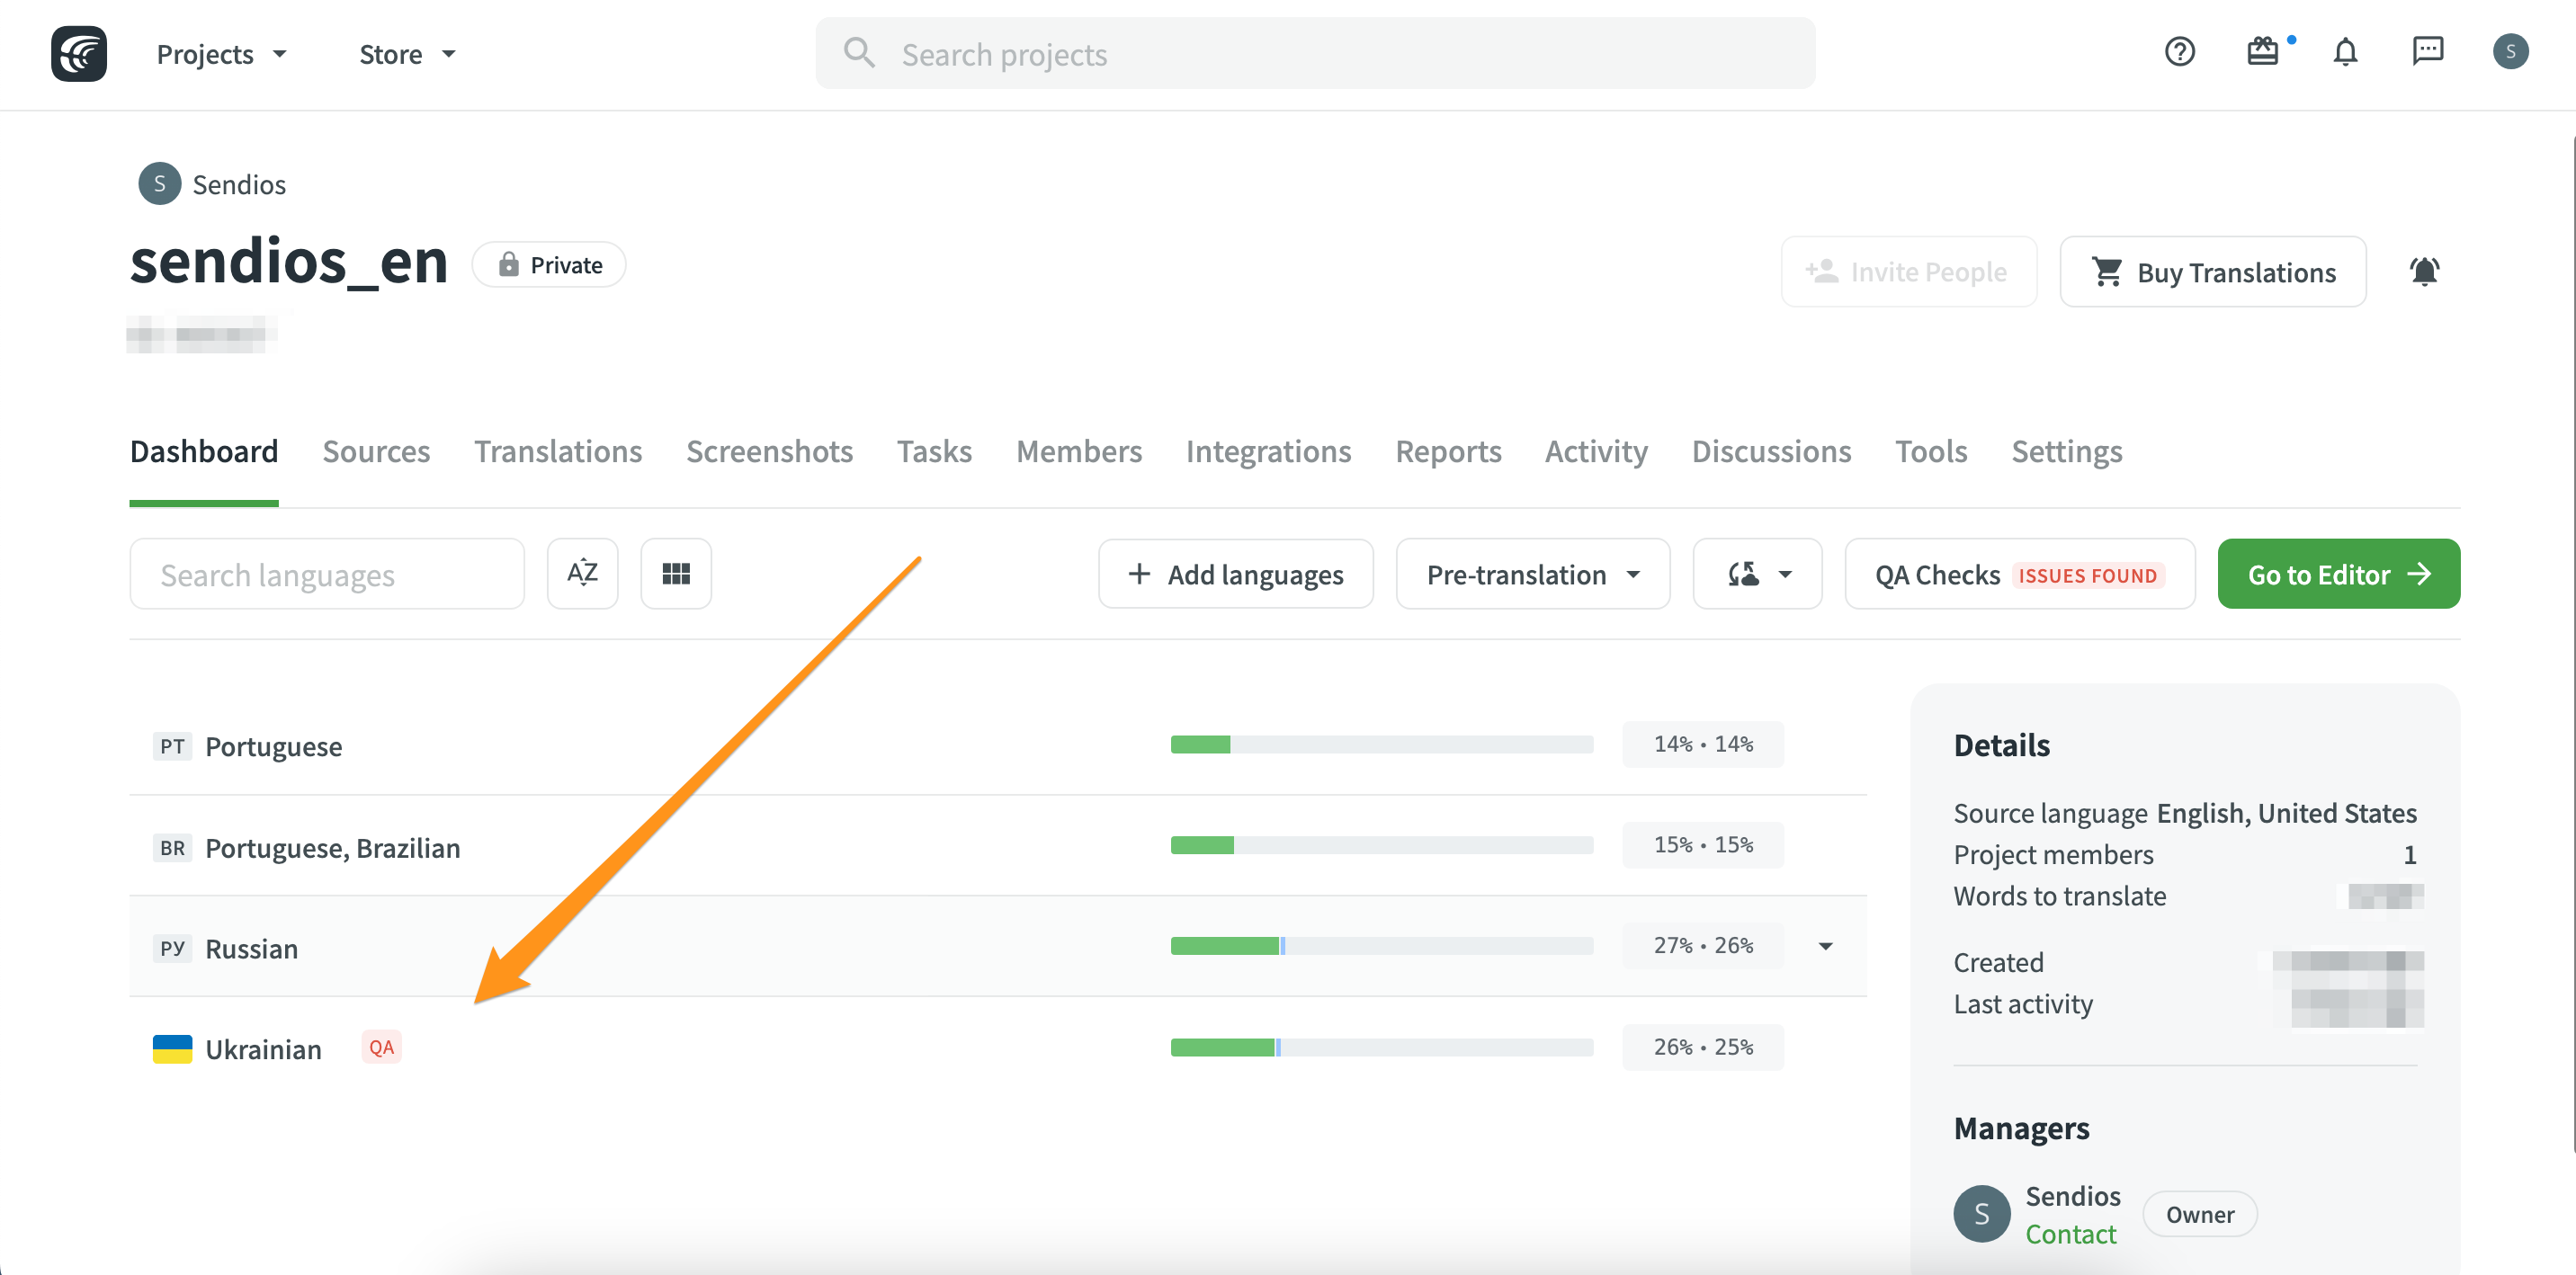
- Go to your project section and select the desired translation language;
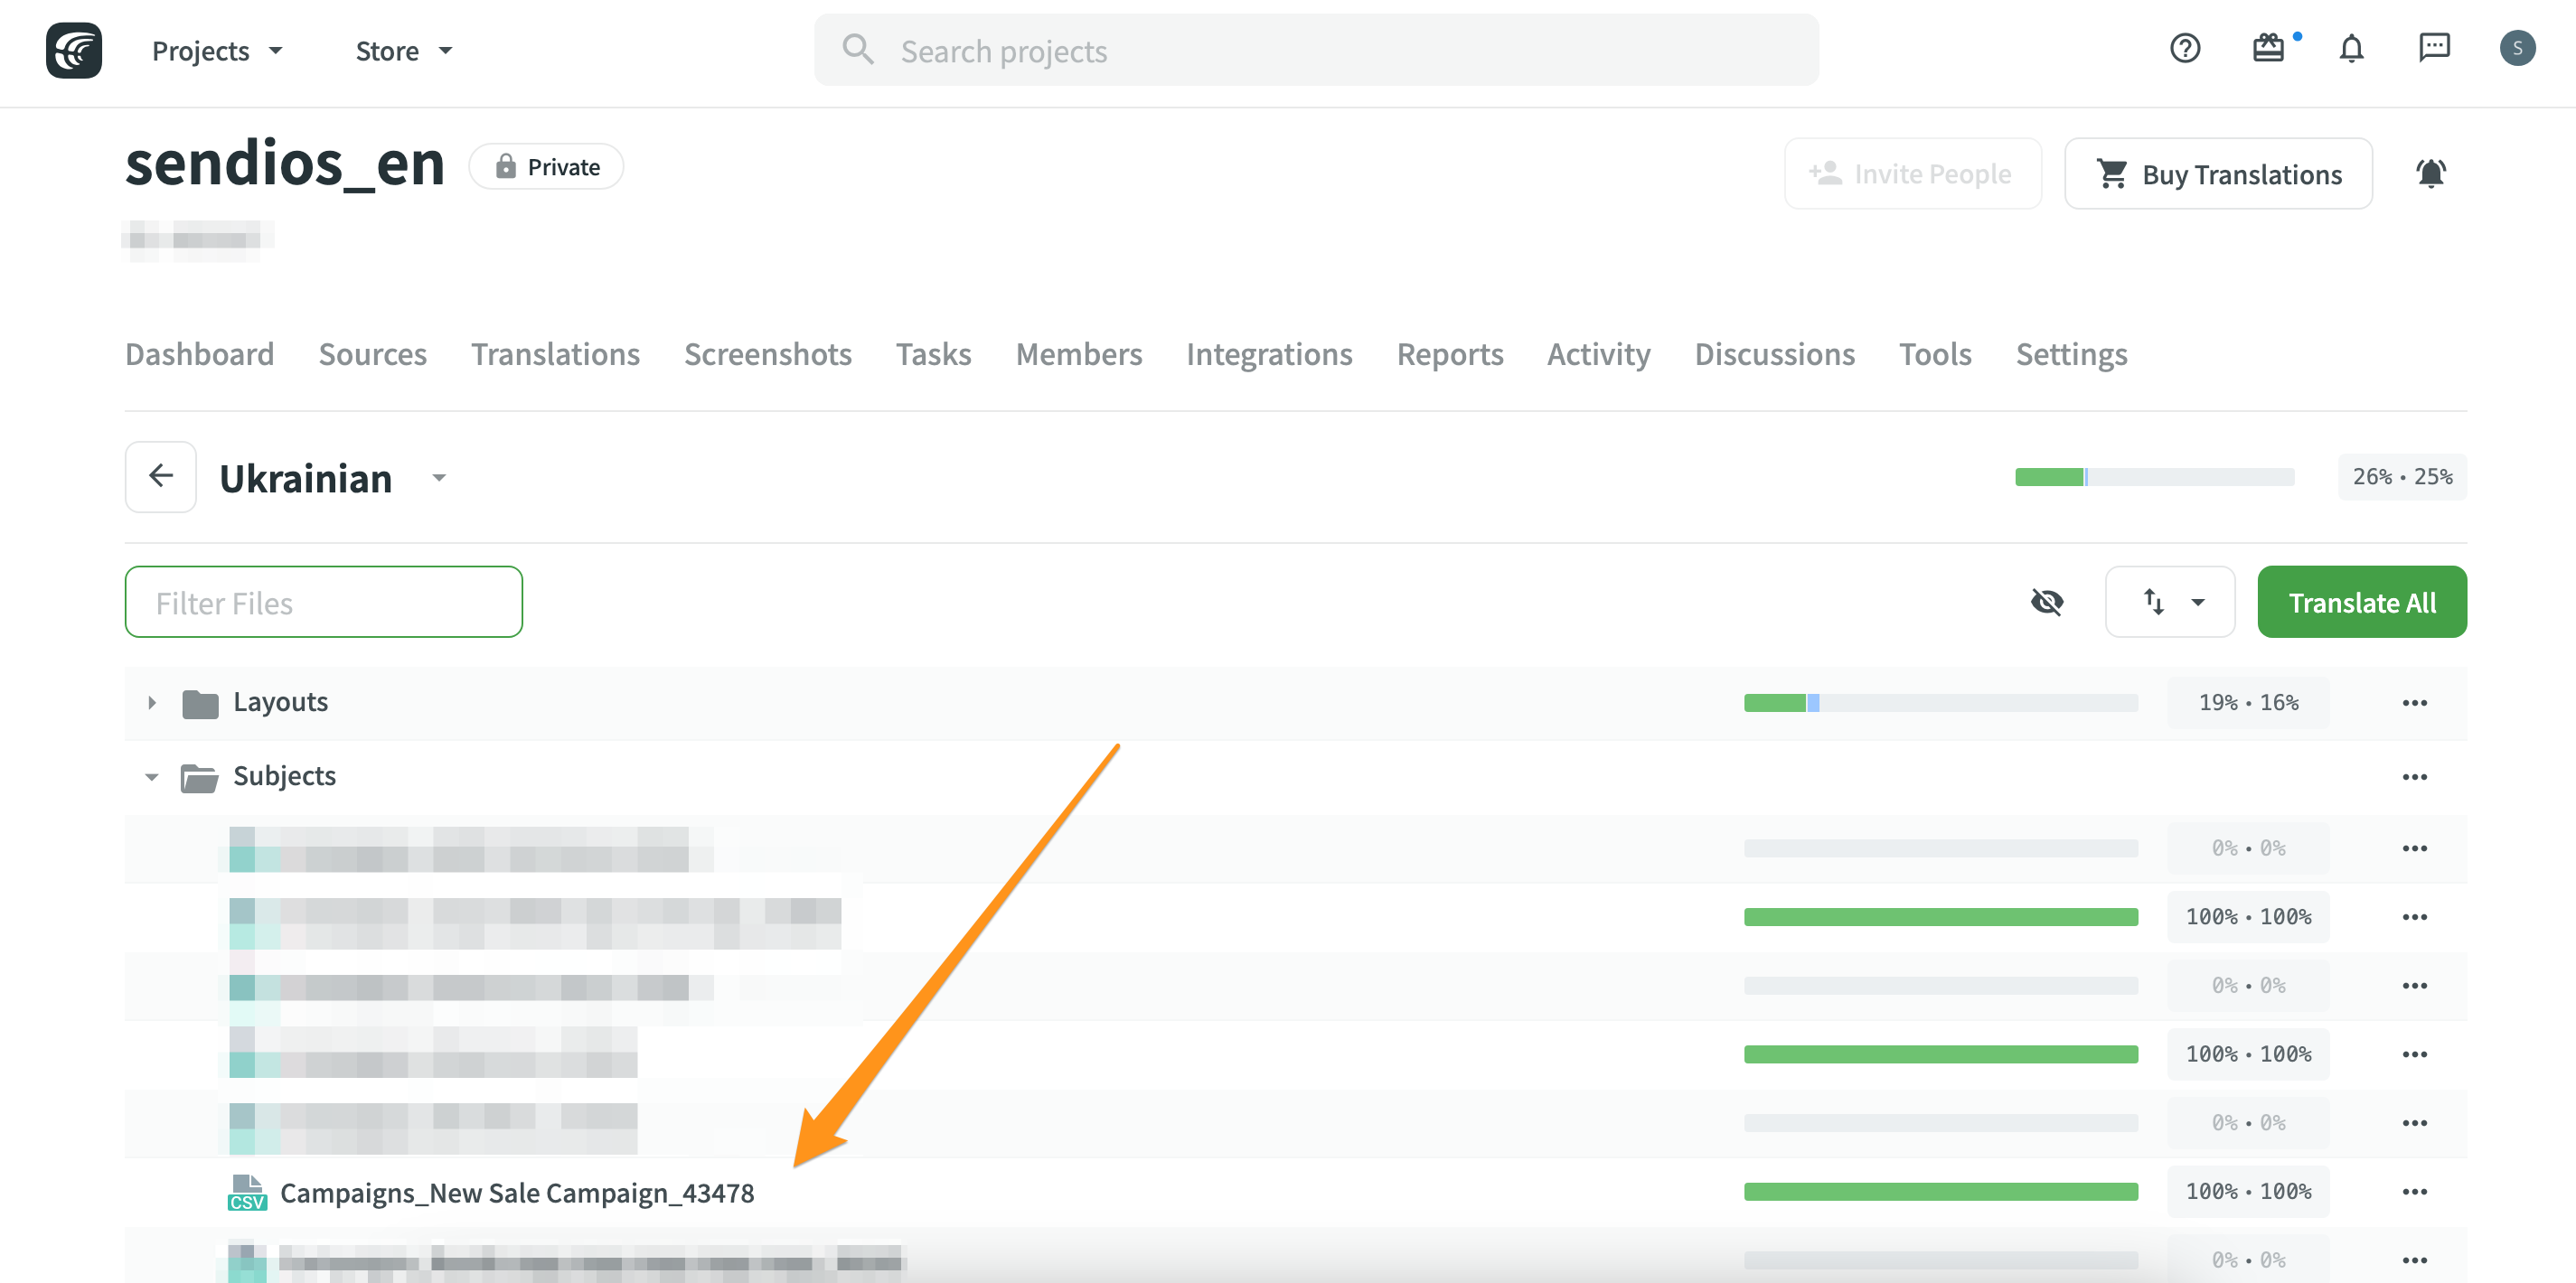
- In the list that appears, find the object you want to translate, based on the type ("Layout," "Subject," "Template"), and select the appropriate file;
Make sure that translations are added to the appropriate folder.
- Enter the translation text or select one of the proposed options below and click Save. Translate all phrases you find in the left list sequentially;
- Translate items for all selected translation languages;
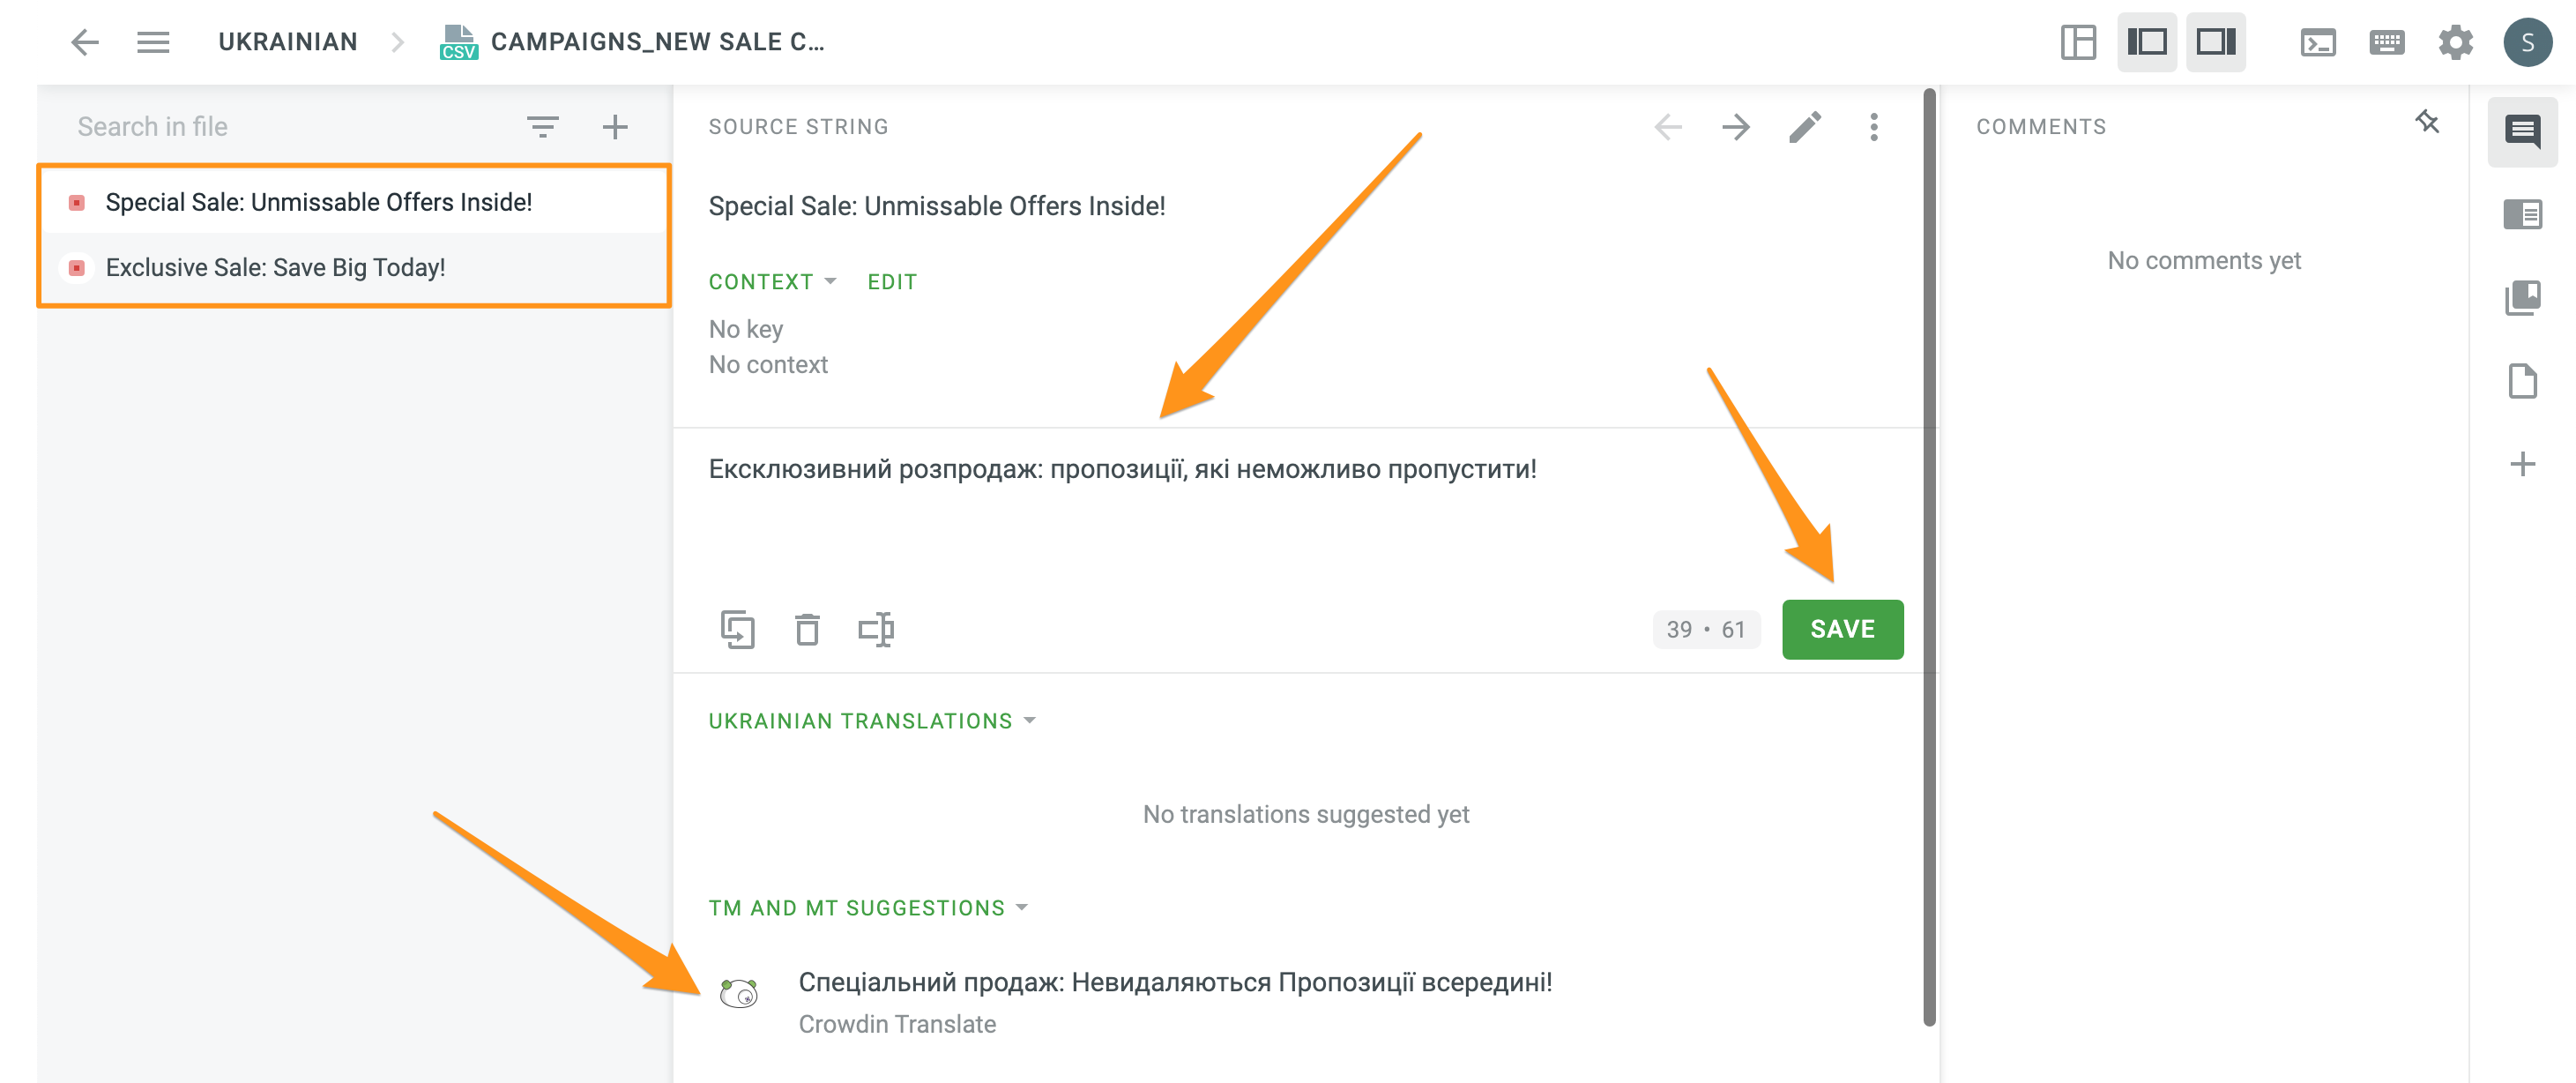
You can learn about different translation strategies on the Crowdin portal.
- After that, review the translations and confirm their correctness by clicking Approve for each of them separately;

- Wait until all translations are uploaded to the Sendios system and are ready for use and further sending.
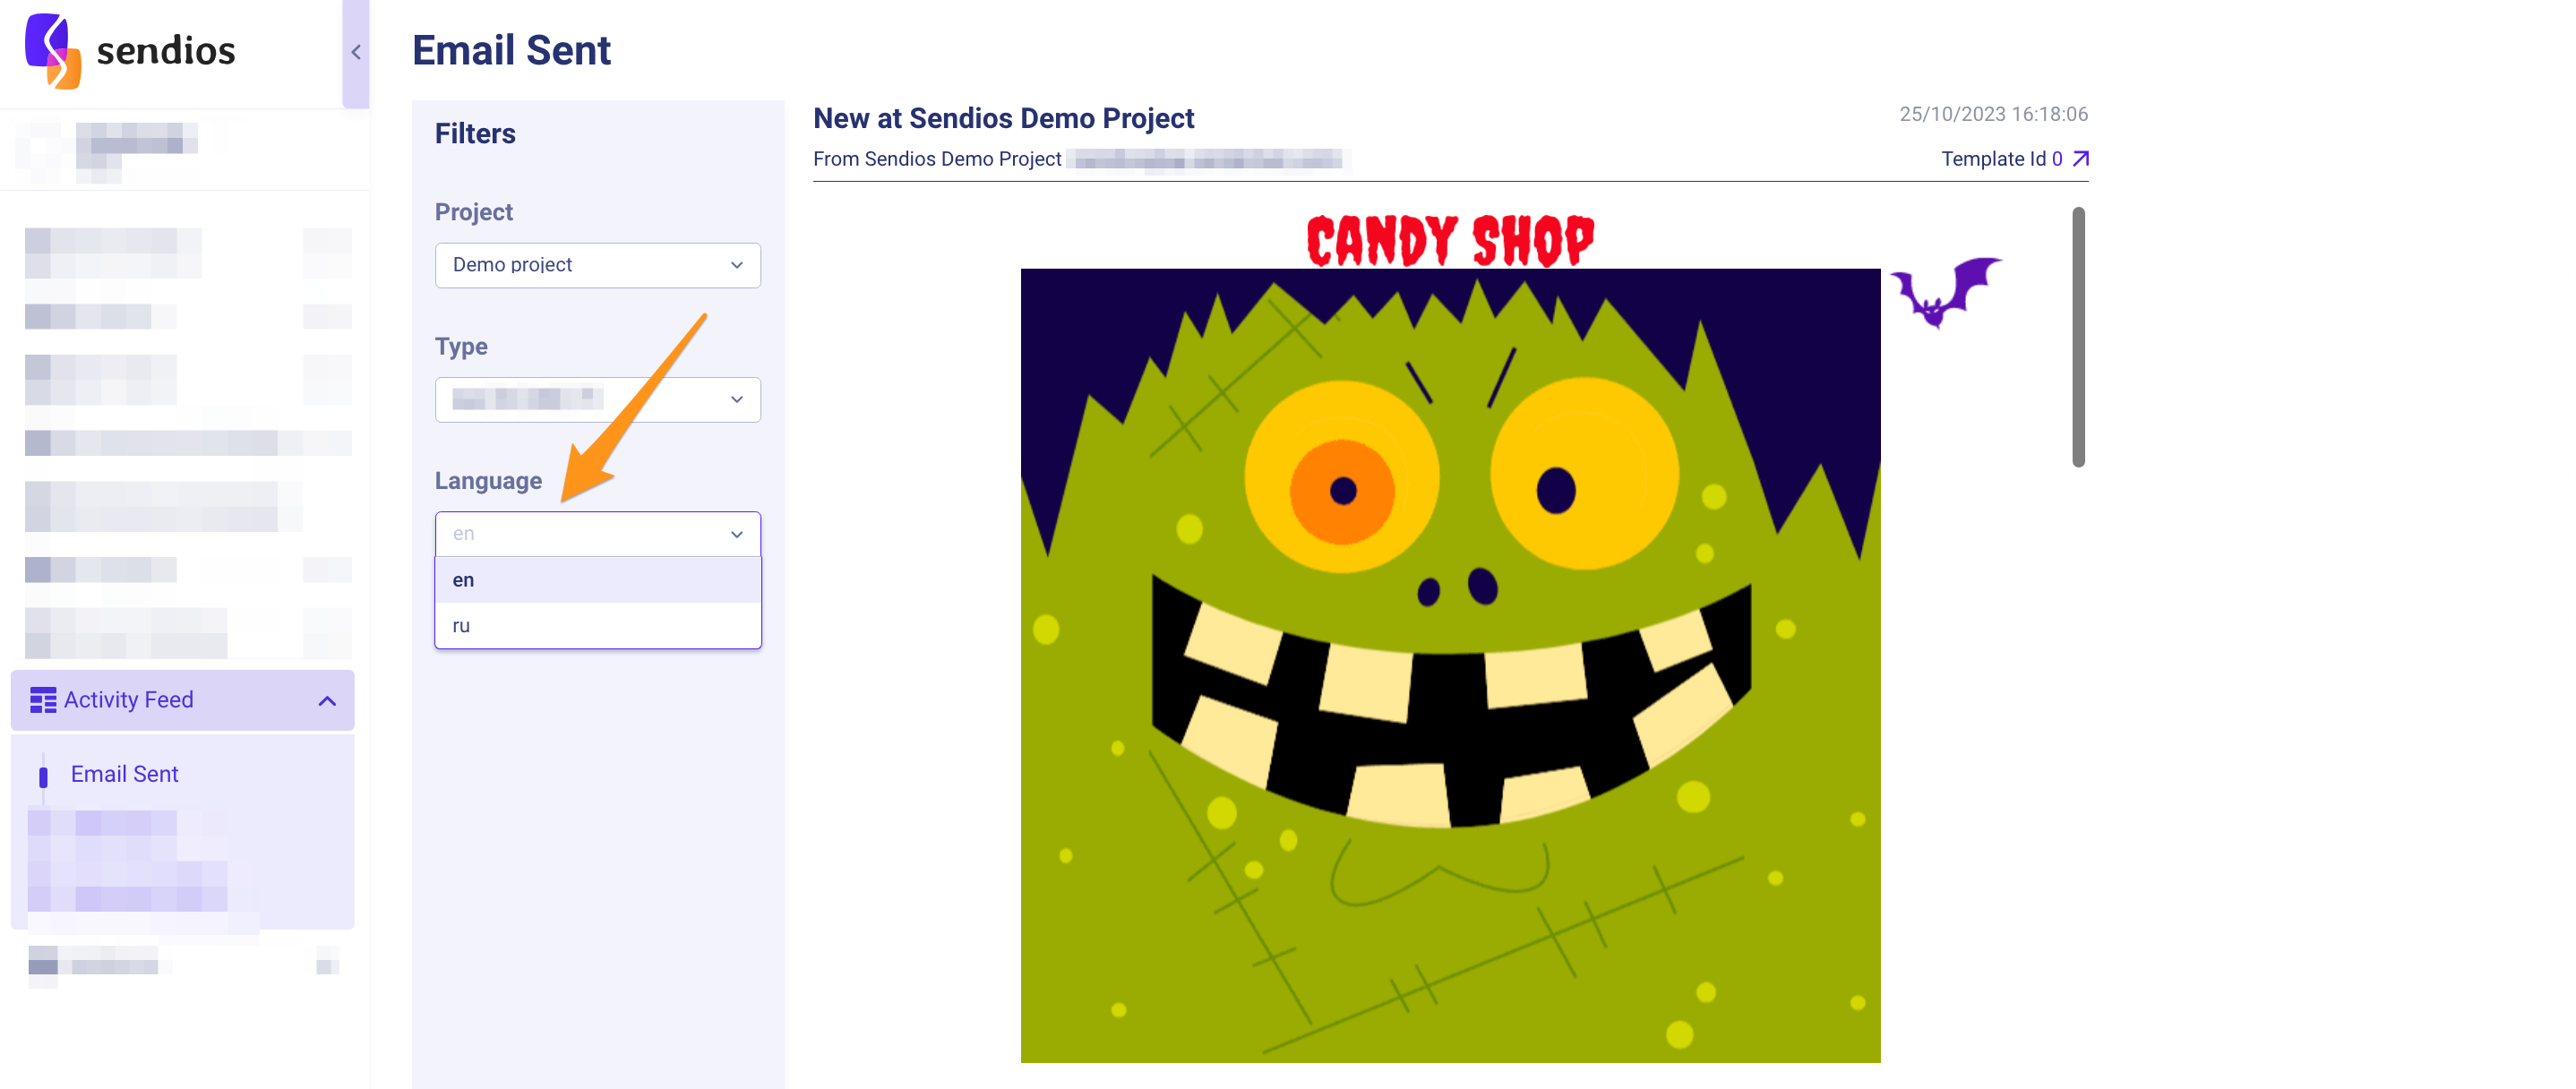
Viewing sent emails and messages
You can check how the emails and messages were sent, depending on the selected language, in the Activity Feed section. To do so, select the desired communication channel from the drop-down list ("Email Sent," "SMS Sent," "App push Sent") and choose the required language in the Language section.
Updated over 2 years ago